The freestyle underwater pull is, without a doubt, the most analyzed aspect of swimming technique.
Today, a Google search for “freestyle pull” returns over 50 million results. A lot of the online advice is very good. But, for a beginner, it can be overwhelming. Where do you start? We’re going to answer that question in this module.
I break the freestyle pull into 4 simple phases — reach, catch, pull and push. I describe each below, then we use workouts and drills to practice each of these phases.
But before I explain each phase, let me take a minute to give you something to think about as you practice your pull. When I share this nugget with beginners, I often see lightbulbs go off.
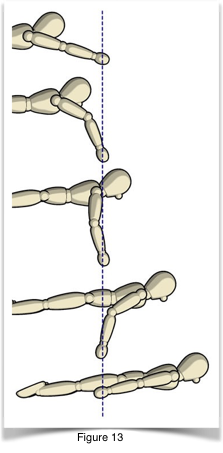
When you swim freestyle, your pulling hand should not move through the water….your body does. In a perfectly efficient stroke, the pulling hand stays “anchored” in the same place you started the pull, while your body moves forward. (See Figure 13)
When a swimmer fails to keep their hand anchored, it’s called slipping the water.
Pull Phases — Reach, Catch, Pull and Push
So, here’s the pull motion in a nutshell: Reach through the water, catch ahold of stable water; then maintain the hold as you pull and push yourself forward.
I often use an analogy to help swimmers visualize this process.
Imagine a ladder running parallel to the surface, around 12 inches underneath you. As you swim, you reach and glide through the water. Catch ahold of the furthest rung you can reach and pull yourself forward. Then, as your hand pass your shoulder line, the pull turns to a push. As you pull and push, you strive not to loose your grip on the rung, i.e. slipping the water.
Make sense?
With that analogy in mind, let’s talk about each phase of the pull.
Reach
Remember we talked about upfront swimming in Module 2: Timing? If so, you’ll remember that having a lead hand, reaching and gliding is essential. Doing so makes your stroke smoother and more relaxed.
Backing up one step in your arm stroke, how your hand enters the water makes a big difference on how well you are able to reach and glide. Module 5 covers this in more detail. But, for now, you should know that it’s important that your hand enters in front of your shoulder with a bent arm. From there, you reach through the water to the furthest rung, 12-inches below the surface. As you reach, you may find the urge to rotate your body. Go ahead and let your body rotate slightly.
Catch & Pull
So, once you’ve reached through the water and glided, it’s time to start using your arms to propel you forward. To do this, you want to use your hand and forearm.
catch and pull. The freestyle “catch” is probably the most advanced skill we discuss in this course. It takes a lot of practice and experimentation to find a “feel for the water.”
The catch describes the act of anchoring your hand in the water. You start to apply forward-propelling pressure on the water, with your hand and forearm. To be able to apply forward pressure with the maximum area it’s important to get the right hand and arm pitch.
You must keep your elbow high and wrist flexed in order to grab the most water with the most surface area.
With your arm extended, a flat hand, flex you wrist and press down on the water while keeping a high elbow. Play around the with pitch of your wrist.
[Insert Image — Including hand pitch?]
With a
At full reach and without dropping your elbow, feel like you are tipping your finger-tips over the front of a barrel (again flexing at the wrist), which will start the catch.
At the same time start bending the elbow and pressing back on the water with the forearm in a near-vertical position.
Once you’ve glided, it’s time to start pulling. That starts with a “catch.” Keep your hand flat and press down on the water by tilting
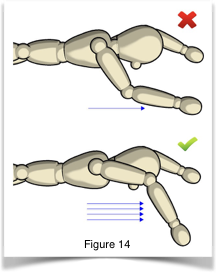
You press down on the water, while keeping your elbow high. Why? Because you want to pull with your hand and forearm. If you drop your elbow, you will not use the entire surface area of your hand and forearm.
Once you’ve anchored you hand it’s time to create forward momentum by applying pressure to the water. But it’s important to understand that a good freestyle pull uses both the hand and forearm to apply pressure. Scooping the water with a hand isn’t nearly as effective as using the hand and forearm to create an oar. This maximizes the surface area that is creating forward momentum.
To do this, you must keep your elbow high as you press the water. Dropping your elbow allows water to slip your arm. (See Figure 14.)
Push
The part of the freestyle pull that creates forward momentum isn’t a pull at all. It’s more like a push. Once the arm passes the shoulder line, the swimmer focuses on pushing water towards their feet. Think about how you climb out of the pool. You first pull yourself up, keeping your elbows high. Once your hands pass your shoulders, you push yourself up.
The last part of the pull is to extend the arm, like a tricep press. After the hand crosses your bellybutton, the swimmer should think about “squeezing” the water behind them. As they do this, the lead arm is reaching through the water. The effect of squeezing the water behind them and gliding with the lead arm can create an amazing sensation. If you haven’t been squeezing the water, you will feel a burn in your triceps.
To return to the ladder analogy, after your hand passes your bellybutton, push that rung towards your feet. The other hand should be gliding, reaching for the next rung.
…and finally…
Relax. This is probably the most important tip for beginners. Relax. Don’t tighten-up, rush or force your arm pull as you practice the above tips. As I said, there’s a lot written about the underwater pull. It’s important not to over-think the technique….relax…practice one thing at a time and have fun! :o)
How to Practice
I suggest that you start by gaining a basic understanding of the pull phases. Then, practice each of these phases by isolating them — one at a time — using the drills and workouts posted at MyTriathlonSwim.com.