Goal: Establish a neutral body position that reduces effort.
Finding a “neutral” body position is probably the most important skill for beginners to learn.
There are two main reasons for this.
First, a good body position is an essential foundation for an efficient swim stoke. It’s analogous to having good balance while riding a bike. After you have established your balance on a bike, you can start building techniques to ride faster. Trying to go fast before learning to balance is futile. The same is true of your body position during the swim. Establish a good body position in the water, then build.
The second reason it’s best to start here is that it’s relatively easy and small adjustments to your body position can make a huge difference to your swim, almost instantly. I’ve see swimmers move from dreading the swim to loving it by making a small change to their body position. What used to be a slog becomes easy.
There are several problems that stem from poor body position, but the most common for beginners is “sinking leg syndrome.” These swimmers often kick frantically to stop their legs from dragging them to the bottom of the pool. They get exhausted and frustrated.
If that sounds familiar, there’s good news….it’s relatively easy to cure. Sinking legs are not normally a symptom of a weak kick but of a poor body position. In fact, with the right body position, a swimmer’s legs will stay afloat without any kicking at all….which is awesome news for someone that’s about to use their legs to ride a bike and run for several miles!
The Suspended Seesaw Analogy
Sometimes it’s helpful to use dry-land analogies to help explain aquatic principles. I’ll share several of these analogies within this course. Here’s the first…
As you swim, think of your body as a suspended seesaw. Your body is a plank with a fulcrum at your hips. Lifting your chest higher in the water will place downward pressure on your legs. Pushing your chest down into the water, will cause your legs to float higher. (See Figure 1.)
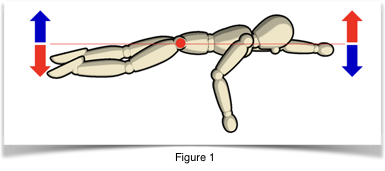
This works because you are pressing your air-filled lungs — your natural buoys — into the water, which allows your legs to float to the top. One more helpful analogy is to think about “swimming downhill.”
But there are three things you need to do as you push your chest down into the water:
- Engage your core. For this dynamic to work, you must stay “plank-like”…like a seesaw. That means keeping your core engaged and strong. In fact, to supplement this technique shift, I recommend doing some dry-land core exercises. Your abs will need to do their part in helping you find the right body position.
- Keep your legs long. Make sure that your legs also stay plank-like. Keep them long. (We’ll cover more on your kick in a following module.)
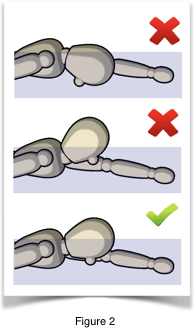
- Don’t duck dive. Notice how I recommend pushing your chest down and not your head. Pushing your head deeper in the water will cause you to “duck-dive” to the bottom of the pool. You may need to lift your head slightly as you push your chest deeper, to make sure the water continues breaking at the top of your head. (See Figure 2.)
How To Practice You Body Position
Body position is one area that’s very personal. We each also have a natural buoyancy, based on our body type and composition. You’ll need to spend some time discovering your own personal body position.
I highly recommend that you get a freestyle snorkel and fins. Several workouts and drills in this course — and especially those focused on your body position — will use this equipment. It helps you explore, without having to worry about breathing or pulling.
So, the next time you swim, experiment with different body positions. Push your chest bone into the water. Remain plank-like. Think about “swimming downhill” and try to find that spot where your body is neutral in the water. That’s the spot where you can swim with minimal effort from your legs.